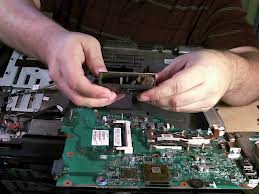
Effortless DIY Cooling Fan Repair
Two weeks ago, we shared on “Fixing Black Screen of Death (BSoD) on your Computer“, today we will talk about “Effortless DIY Cooling Fan Repair“.
Irritating clicking and unusually loud whizzing sounds from your cooling fan does not simply indicate that the cooling fan is broken, but could be a warning that your notebook and the electronics inside are on the edge of overheating and, sadly, of destruction.
But then, it is not difficult to repair. What you will need is a screwdriver, compressed air and replacement fan; and the fixing may cost you only about $35 to $55 and may take only about an hour. However, if you’re lucky, you may not even need a replacement fan.
Most systems have two or more fans to avoid overheating of the processor, graphics hardware and hard drive. However, the fans are more prone to excessive dust and dirt accumulation and the buildup of debris that clog the fans making it noisy and cause the fan not to bring in enough cool air. If you are then starting to be annoyed of those buzzing and ringing sounds, it’s time for you to do this repair.
You may start off by locating the vents of the system. These are where fresh air goes in and hot air is exhausted. Most systems have two or three on the side or the bottom, so it is not that difficult to find. Having known where the vents are, insert the plastic straw from the can of compressed air into each vent and gust out all the dust possible. Yet, have a face mask and a vacuum cleaner ready since the amount of dust may be unbelievably disgusting.
If that does not do anything, then you have to open the case. You may find a number of screws in the bottom of the case which you need to remove so as to open the case, but it may depend on the structure of the notebook. You may want to check the manual or search online about how to safely open the case. After you have carefully opened the case, locate the fan and clean it of remaining dust and accumulated dirt.
Check also the fan’s blades to see if there is something that obstructs it from twirling. Using you finger, spin the blades and observe whether they make clicking or hissing noise or are quite stuck. If they are, it’s time to purchase a replacement fan.
Take note of the model number of the fan and you may do some online search for a replacement fan. There may be fans available from spare parts store for your computer which might be about five- or six- years old.
When you have put your hands unto the correct new fan, you can remove the old fan. Make sure that you have disconnected the fan’s power connector, though. The fan in the system may be attached to a frame that holds it in place, so you may need to unscrew first the frame, and then unscrew the fan from the frame.
Carefully remove the fan. Working the fan loose may take a little dexterity because the fan may be tightly fitted into the frame. You may probably see a thin silver- or copper-colored tube that usually fastens to the fan structure -the heat pipe. It draws heat off of the processor or the graphic chip that you must be very careful not to bend it while removing the fan because it may affect the fan’s efficiency at cooling the processor.
Gently slide in the new fan and screw everything back on. Check first if the fan is working before screwing the bottom of the case back in place by plugging in the power connector and start the machine. The fan may not start right away, but don’t worry because the fan may only turn on after the system heats up. If the new fan is working, close the machine and you may now get back to working blissfully.
If you need someone to help you in repairing your laptop cooling fan, click here to contact us now!
Fatal error: Uncaught Exception: 12: REST API is deprecated for versions v2.1 and higher (12) thrown in /home2/laptopre/public_html/wp-content/plugins/seo-facebook-comments/facebook/base_facebook.php on line 1273


